← All TWiT.tv Shows (Audio)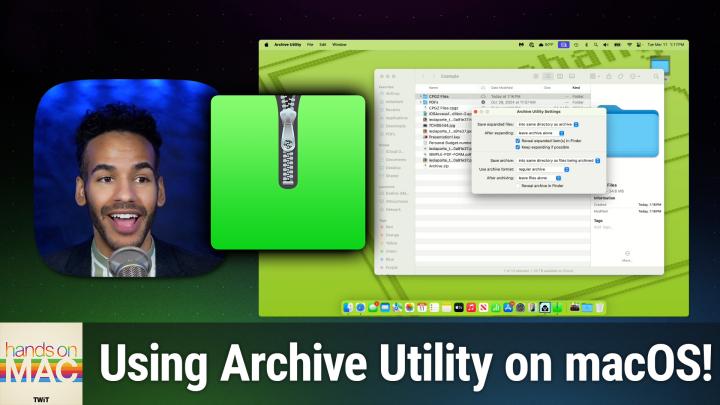
All TWiT.tv Shows (Audio)
Hands-On Mac 173: Archive Utility
00:21:32
Understanding Compression Settings on Mac
Loading summary
Transcript5 lines
- [00:00]
A
Coming up on Hands on Mac, let's take a look at a very important tool on your Mac called the Archive Utility. Stay tuned, podcasts you love from people you trust.
- [00:15]
B
This is Twit.
- [00:25]
A
Welcome or welcome back to Hands on Mac. I am Micah Sargent and today we are taking a look at a tool that you may have used without realizing it. It is a tool called Archive Utility and it helps you compress and uncompress or decompress files that you have on your Mac. Now, there are different ways that this tool can work and again, many of them kind of happen in the background. So we're going to take a look at how to use the tool on its own and actually opening it up and making use of the different files and formats that are part of the Archive utility. So let's head over to Mac OS and take a look. Here we are on Mac OS and first and foremost we can go into a directory like this example folder that we've had for quite some time. And let's say we're trying to save some space. We've got some files that exist that are taking up a lot of space. Now, if you're working with compressed files like a jpeg, for example, those files will probably not be able to be made smaller with compression. The way the compression works is it kind of looks for different repeats in the code and creates kind of a shorter reference. So let's say, for example, you have, and this is a very sort of high level, not precise example, but let's say the compression algorithm looks through the data that makes up a file and sees that there's a bit of repeat in the code AAA bbbcc and it maybe comes up again later in the code AAA bbbcc. It can take that bit of data and make it smaller and say that abc, when that comes up should be when it's decompressed, turned back into AAA bbbcc. And so then you don't have as much of that repeat in the code. It's kind of shrinking it down and referencing to the fact that it is actually a larger bit of data. When you have fil already compressed like a JPEG file, it's already done that in the code, it's removed the redundant parts of the code and made that file smaller. So in some cases, when you archive a jpeg, the archive might end up being actually bigger than the actual JPEG outside of that archive. So let's go through here and look at some of the different formats. We've got an ePub, we've got a keynote presentation, a numbers presentation, and a couple of PDFs. I will select those and I will right click and choose Compress. When I choose Compress, it uses the Archive utility to create a zip archive. Now, if we select those again, I think it was these plus that prenote or that keynote presentation and the epub. And we come up to the view and show the status bar, we can see that we've got six of these files selected. There we go. And it's 34, 4.6 megabytes. The zip archive is down to 33 megabytes. So it has saved some space. Now, it's important to understand that when you select these files and use that right click menu to choose to compress the files, it's always going to create a zip archive. A zip archive is a very standard kind of compression format. It's been used for years across different platforms and is kind of the well known method of zipping, of making files smaller. There are different types of archive options and only some of them are presented to you with the Archive Utility. So let's talk about how we gain access to the Archive Utility. Simplest way is simply to hold down the command key on your Mac and hit the space bar to bring up Spotlight and start to type in Archive. At which point you will probably see Archive Utility pop up. We can open up Archive Utility and you'll notice that there's no ui. Instead there's only a bar at the top of the screen and at the bottom of the screen or wherever you happen to have your launch bar. It will show you the Archive Utility icon, which is a green folder, in this case with the zipper in the middle of it. Now, here's what we want to do. We want to go up to Archive Utility and click on it in the menu bar and choose Settings. From here we can see the different options that are made available to us. So let's go down the list. The first option says save expanded files. And this is a choice of where when you use the Archive utility. And this is where I was talking before about how you may use it and you didn't realize it. By default, Safari has a feature enabled that says essentially open safe files. And if you've watched my episodes on Safari, you'll know that I told people to turn that off. I still hold to that. But for some reason Safari considers zip files to be safe files, which means that in the background when you download a zip file, it will go ahead and open. It will expand that zip file and that's Archive Utility working In the background. So that is one way that you may be using it. And you didn't realize that you were. Now you're telling Archive Utility where you want to save the expanded files, the files that are coming out of the archive. You can say, I want them to be in the same directory as the archive, which would mean that if I Double clicked on Archive Zip to run ArchiveUtility Utility, it would expand all of those files into this same directory, which is example. I can choose to have it go into a specific place. So you'll see it's into and three dots and that says choose a place that you want the archive, the expanded files to be saved. So this will always put them in that place. So maybe you have a folder in your Documents folder that you want to say is the place where expanded files always go. That's what you would choose here. And then anytime you do an expansion, it'll go there by default. Again, it goes into the same directory. That's what I use. That's what many people use, because then it's right there. Then you tell Archive Utility what you want it to do after you have expanded that archive, by default, it leaves the archive alone, meaning that the archive zip is still there. You can say you want it to go to the trash. So I've expanded the archive. I don't need the archive anymore. Put it in the trash so that I can make the choice to delete it or keep it, or just go ahead and delete it entirely. Don't move it to the trash for me to remove later. Go ahead and just delete it. Get rid of it entirely. And then the last option is to move the archive to and again it's got the three dots, meaning that you can choose where the archive goes. So maybe instead of having the expanded files go to a specific location, maybe you just want to place on your Mac where your different zip archives or what other archives you might have are automatically placed so that you can get to them later if you need them. That's when you would choose that. The next option says Reveal expanded items in the finder. This is particularly helpful if when you chose Save expanded Files and you chose a specific directory to have this selected. Because what it means is Finder will pop open and show you the place where those files were expanded. Of course, if you have it expanded to the same directory as the archive, they're all going to be in that same place already and it'll be fine. The next option is called Keep expanding if possible. Certain types of archives can actually have archives within them. So it's sort of a Russian nesting doll of a situation. So this tells Archive utility when you're expanding the main archive. If you find an archive within, expand that too, and expand and expand and expand as many archives as you find. I recommend keep keeping this enabled. By default, the next section is for actual archives that you are creating. So where above we chose how to sort of de archive how to expand an archive. The next set is creating them. So save archive. You can say, hey, when I select those files and I right click and I choose compress, do what you saw earlier, which is the archive gets saved to the same place as the files that we were trying to archive. You can then also choose a specific. So again, if you have a folder that you specifically want to use as your archive, you can do that. The next option says use archive format. And we're going to come back to this one because it's a little bit more involved. And we'll talk about each of the options that are available to you. And then after archiving, what do you want it to do? The files that I selected, leave them alone. Leave them there, don't touch them. Move the files that I've archived into the trash, because now I've got an archive of those files, or delete the files completely so it works the same as what we talked about before, where don't even move them to the trash to be sort of adjusted later. Go ahead and get rid of them or move files to. And of course, that lets you choose a place on your Mac to move those files so that the archive is in the place where you put it. And those files that you selected go to where they need to go. And then of course, you can choose whether to reveal the archive and finder. So if you have that archive moved to a specific place, you probably want to select Reveal Archive and Finder so you know that the archive was created and placed where you would expect it to be placed. Hey, prime members, are you tired of ads interfering with your favorite podcasts? Good news, with Amazon Music, you have access to the largest catalog of ad free top podcasts included with your prime membership. To start listening, download the Amazon Music app for free or go to Amazon.com adfreepodcasts that's Amazon.com adfreepodcast to catch up on the latest episodes without the ads. So let's talk about the most important section, which is use archive format. And the first thing I want you to understand is that when you change this, it will not make a difference to the context menu's option of compressing. So what I mean by that is if I select some options here, as we did before, I right click and I choose Compressor. That compress option is always going to create a zip archive. It's not going to create any other type of archive. So just keep that in mind. Now, let's talk about the different options that we have available to us. Now, A compressed archive by default is actually not what you would expect. You're probably thinking that that means a zip archive, but no, instead, a compressed archive is a CPGZ archive. And this is a type of archive that starts by creating a sort of set of files in a. In one file. So think of it like a briefcase. I open up the briefcase and I put a bunch of files into it, and I close the briefcase. That is a regular archive, meaning we didn't do any type of compressing to it. But if we want that archive to be compressed, then we choose this compressed archive. What it does is it takes that briefcase and kind of shrinks it down so it runs a compression algorithm on it to make it even smaller. So with that, we have the file format that's called cpio, and that will make the sort of basic archive. And then CPGZ is the archive that's created using a type of compression that's a little bit different from zip. So what does this mean? It's a lot, right? Compressed archive is going to put them in the briefcase and make them smaller, but it's going to be saved again as cpgz. But how do you actually create a CPGZ archive if when I select files here, it always makes a zip, and you can see this has Compress Archive chosen. So obviously it's not creating that. Whenever I right click to choose Compress, it's always going to do zip. We go up to File while Archive utility is in focus, and we choose Create Archive. From here, we can go to our desktop, we can choose the example folder. And here's the important part. Watch what happens when I try to select multiple options. Here. I'm holding down the shift key and I'm trying to click on other things to select multiple options. And you can see I'm not able to. That is because with this compressed archive format, it works on a directory or it works on an individual file, meaning for us, it works on a folder or it works on an individual file. So the first thing we need to do is select the files that we want to put into this compressed directory and right click, and we'll choose New folder with selection and we'll call this CPGZ Files. And then what I'm going to do is actually take all of these files and hold down the option key while I drag them to make a copy of them back in the main directory. Now we've got them in the CPGZ files section and we'll choose While Archive Utilities open Create Archive. We'll choose CPGZ Files that directory, that folder and choose Archive. Now you can see. Ta da. We have successfully created a CPGZ files archive which comes in at 34.4 megabytes and the original folder is 34.6. So it did save some space. The next option in Archive Utility after cpgz, also known as Compressed Archive, is Regular Archive. This is the briefcase without anything done to it. This is just how you take a bunch of files and make them into one thing. So if you're just trying to move files to a different place and you don't want to deal with having multiple files all at once, but you don't need any compression, a regular archive which has the file extension CPIO is what you're doing there. Again, CPGZ is just a CPIO archive that is then acted on to help compress it. The next option is zip, which you are very familiar with already, so you know what that one is. And the next option is Apple Archive. So let's take the CPGZ files folder and we are going to call this AAR and we will reselect archive utilities. We've got Apple Archive selected. We'll choose File, we'll choose Create Archive and now we will select AAR files. Again, you can't select individual files here, it won't let you. You have to do a directory or a specific file. Now this is going to do a compression of directories of files of and it does this using what is available on your Mac. In terms of performance, it's a multi threaded compression. So once we select this, we've got that AAR Files option. And importantly, you can see 34.6 megabytes, 34.6 megabytes, AAR files has no compression on it at all. And then last but not least, so again, much like the regular archive, this is a briefcase with an Apple logo on it. It puts all those files together with what's called lossless compression and has them all available to you right there in that one spot. And then Apple Encrypted Archive is a er and it does this very similarly to the Apple Archive, but also provides an encryption so so we will change this to a er like. So we will go to Archive Utility, we'll go up to File, we'll choose Create Archive, and we will select AER Files and choose Archive. And you'll notice that it automatically creates a password that is encrypted and gives you the ability to store it in your keychain. I recommend doing that if you don't have a password manager. Otherwise, a password manager is another option here. And we'll choose Encryption. So it encrypts the files and then stores them in this AEA file format. And in this case you'll notice that there was some space saved. So encrypting it and compressing it, it was able to create that archive and save 2.2 megabytes. Those are the different options that are available to you. And importantly, because I am on this Mac and because that password was saved to my keychain, I can simply double click on this and use my Touch ID to access the password in my keychain and be able to open it up. And I'm going to go ahead and move that to Trash, as well as the AER files to kind of get it back to the different options that are available here. Now, once again, I want to remind you that choosing anything in this Archive format option does not change what that standard compression does. That standard compression is always going to be zip, because of the kind of full nature of zip as a compressed archive that is available for use on different machines. Whether you're on Linux or you're on Unix or you're using Windows, you're using macOS, you're going to be able to act on a zip archive. Last but not least, if you want to, you can also go up to File and choose Expand Archive and select an archive to have that expand. But the same thing is done by simply double clicking on one of these archives and having the archive utility automatically act upon it. So. So that is an overview of the archive utility on macOS. I think you'll find that it's actually a rather powerful tool that you can use to be able to save space on your Mac and transfer multiple files at a time to different machines, or to store on a flash drive or whatever it happens to be. It is a tool that kind of hides behind the operating system, and so being able to go in and use it is kind of fun, I think so. I hope you enjoyed this episode of Hands on Mac. And of course, I'll be back next week with another episode for you. Until then, always be sure you can reach out micahit TV to get in touch. Thanks and I'll see you next week. Bye bye.
- [20:38]
B
Hey buddy, are you a geek? Are you a tech enthusiast? Then I would love to invite you to join. Join a tech community like no other. You can gain exclusive access to our incomparable quality tech content for just $7 a month. With Club Twit as a member, you'll enjoy all Twitter shows ad free plus access private video feeds for insider shows like iOS today, home theater geeks and so much more. Dive into the members only TWIT plus bonus feed for behind the scenes content club discussion and special events. But here's the best perk. Join our incredible Discord community to watch live show productions, chat with hosts and participate in exclusive members only activities. It's your backstage pass to the world of twit. Whether you're a tech enthusiast or a lifelong learner, Club Twit elevates your knowledge while entertaining your interests. Get two weeks free when you sign up now for $7 a month and unlock unparalleled access at Twit TV. Club Twit. That's Twit TV ClubTwit. And from the bottom of my heart, thank you and welcome to the club.
- [21:59]
A
Geico's motorcycle expertise means I'm covered by people who know bikes like I do. I'm happy as a clam. No conclusive scientific research has shown Clam experience happiness. It just meant that I feel really good about my coverage. I mean, even if you took the climb out for the best day ever, visiting the zoo, taking a scenic ride, knowing you're insured by specialists, and sharing a strawberry ice cream cone together, the clam would not feel happy and your strawberry cone would taste sort of clammy. Geico's motorcycle specialists who know bikes like you do assume no liability for clammy ice cream cones. Geico expertise for your motorcycle.