← All TWiT.tv Shows (Audio)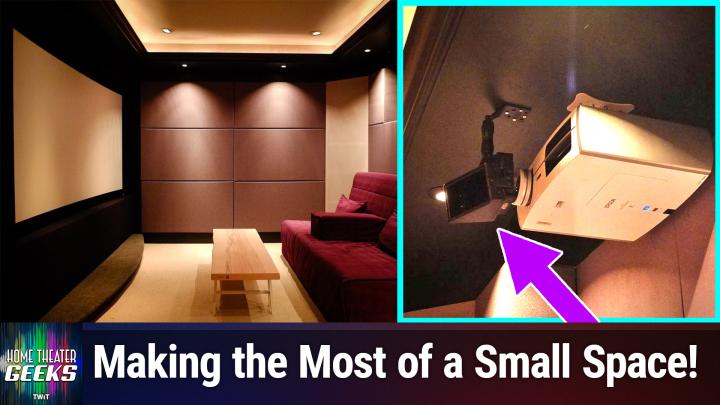
Loading summary
Transcript20 lines
- [00:00]
Scott Wilkinson
In this episode of Home Theater Geeks, I talk about a home theater fit for hobbits. So stay tuned.
- [00:08]
Red Canary Sponsor
This episode brought to you by Red Canary. When cybersecurity threats hit fast, you need an MDR partner that moves faster. Red Canary delivers 24.7expert MDR support, total visibility and actionable insights. Plus it helps you detect four times more threats so you can stay ahead without burning out. Red Canary clears the noise and has your back every hour, every inter incident. Get the backup you deserve. Visit redcanary.com difference to learn more. This episode brought to you by the Electronic Frontier Foundation. In fact, if you ask me, the whole Internet's brought to you by the EFF. For 35 years, the Electronic Frontier foundation has been fighting to make sure that when you go online, your rights go with you. Eff. I owe them a big debt of gratitude. They rescued our podcast and every podcast from patent trolls. They helped encrypt the web to protect your privacy. They prevail in lawsuits against government secrecy and surveillance. These are the good guys, and they have a podcast, how to fix the Internet. It's all about what happens if we win the fight and get things right online. And it's a great listen. The fight for digital rights, it's bigger and more urgent than ever. EFF is member supported. I'm a member. You should be a member. The more members they have, the stronger they can fight in statehouses, courthouses, and on the streets. Season six of how to Fix the Internet started May 7th. Listen@eff.org podcast and while you're there, join the EFF. They're the good guys.
- [01:37]
T Mobile Representative
Hi, Zoe Saldana. Welcome to T Mobile. Here's your new iPhone 16 Pro on us.
- [01:41]
Zoe Saldana
Thanks. And here's my old phone to trade in.
- [01:44]
T Mobile Representative
You don't need a trade in. When you switch to T Mobile, we'll give you a new iPhone 16 Pro. Plus we'll help you pay off your old phone. Up to 800 bucks and you still get to keep it.
- [01:53]
Zoe Saldana
There's always a trade in.
- [01:54]
T Mobile Representative
Not right now. @ T Mobile.
- [01:55]
Zoe Saldana
I feel like I have to give you something in return for karma.
- [01:57]
T Mobile Representative
That's okay.
- [01:58]
Zoe Saldana
I don't really have much in my purse. Oh, let's see. Hand sanitizer. It's lavender.
- [02:03]
T Mobile Representative
I'm good.
- [02:04]
T Mobile Advertiser
Seriously.
- [02:05]
Zoe Saldana
Let me check this pocket. Oh, mints.
- [02:07]
T Mobile Representative
Really, I'm fine.
- [02:08]
Zoe Saldana
Oh, I have raisins. I'm a mom. Wait, wait one sec. I've got cupcakes in the car.
- [02:13]
T Mobile Advertiser
It's our best iPhone offer ever. Switch to T Mobile. Get a new iPhone 16 Pro with Apple Intelligence on us. No trade in needed. We'll even pay off your phone up to 800 bucks with 24 monthly bill credits. New line $100 plus a month on experience beyond finance agreement $999.99 and qualifying ported for well qualified plus tax and $10 connection charge pay off via virtual prepaid card allow 15 days credits end in balance due if you pay off early or cancel mobile.com.
- [02:40]
Red Canary Sponsor
Podcasts you love.
- [02:42]
Scott Wilkinson
From people you trust.
- [02:44]
Red Canary Sponsor
This is Twit.
- [02:56]
Scott Wilkinson
Hey there, Scott Wilkinson here, the home theater geek. In this episode I'm going to feature a home theater that I profiled on AVS Forum all the way back in 2013. It's a charming, tiny little home theater that I thought was really cool for what he did with very limited space. We'll put the link to the article in the show notes so you can check that out. The owner is named David Chu and he has a very small room to work with, roughly 10ft by 10ft in his duplex in Vancouver, British Columbia, and it's a great example of what you can do in a very small space. He started by figuring out the maximum screen size and projector throw distance that he could accommodate in that room and based everything else on that. So we'll start with the floor plan. As you can see, it's a very oddly shaped area. I mean, it's mostly square, but it's got that diagonal sort of entryway open to the office area. The throw distance is only 9ft 8 inches. The original plan was to put the screen on the short wall opposite that angled opening, but but David decided it just felt right to flip the orientation by 90 degrees and I have to agree with him. The next graphic we can see the back of the basement room where the theater is. It has a recessed window which will be completely covered up and provide a bit more throw distance for the projector. The projector can sort of get stuffed into that little window alcove thing. So in the next one we can see these. This blue tape marks the boundaries of a 16x9 and a 2.35 to one screen. The wider screen one, because I guess he watches mostly movies. If you watch mostly TVs, TV shows, then 16x9 would be fine, but if you watch mostly movies, you really want a 2 2.35 to one screen. The screen that he installed is from a company called Elite. It's the lunette cinewide. It's 106 inches wide, 2.35 to 1. It's a slightly curved screen, which we'll see in a, in a photo here in a minute. And that curvature in a screen that big is a good thing, especially at a close seating distance like he has, because it helps reduce what's called pin cushioning. When the projector projects a big wide image on a flat screen, the edges can be somewhat distorted and. And having a slightly curved screen helps that. Okay, so next graphic we will see the subwoofer niche, which was built custom to fit an SVS SB12 NSD12 inch powered subwoofer. Also in this photo you can see the partial frame of the small curved stage at the bottom, which is a feature that most home theater owners like to put in their home theater. Next graphic we can see the tray ceiling, which it will have rope lights around the boundary of this tray ceiling, which you'll see the effect of in, in a couple of graphics from now. And in the next one we can see what are called the surround pilasters, which are these corner units. They're mostly filled with rock wool forming what are called super chunk wool bass traps. The surround speaker is going to be in the upper portion of that column that's triangular column called a pilaster. Now, within this room, acoustic treatment was of particular importance, especially bass buildup in the listening position at the back of the room because the couch had to be very near the back wall. And that's going to build up some serious base energy. So in addition to the bass traps in the surround pilasters, he also installed fiberglass base traps in the rear soffit in the area of the tray above the tray ceiling, which reaches back more than two and a half feet. So you can trap some really low bass brass frequencies in that, in that much space and the space beneath the screen as well where there's not a subwoofer or the equipment rack. He also put in this fiberglass and he treated the walls with something called Roxul Comfort board is installation which has very similar absorption characteristics as Owens Corning 701 material used commonly in recording studios. And here we see the walls lined with that rock Sol comfort board is. Now, David doesn't list listen at reference levels, he said to me. But he does want to be concerned about acoustic isolation to a certain degree because that wall that we're see in this photograph is shared with the other half of the duplex he lives in. So he wanted to be a considerate neighbor and I applaud him for that. So he put in some, some serious sound Isolation material there so that, you know, he didn't start a neighborhood war. Although I, he did say that, that that wall is already decoupled with two stud walls, insulation and 5,8 sheetrock. And he installed another layer of 5,8 inch sheet sheetrock with this material, the sound of damping compound called green glue. And that, that really helped isolate the sound in the room and prevent it from getting transmitted over into the other half of the duplex. So if we look at the next graphic, we can see that there is very little space, especially behind the screen. Normally when you have a projection screen like that, you would put the speakers behind the screen, but there wasn't really room to do that. So. And there's a closet behind that screen wall as well that he, he didn't want to get rid of. So he couldn't put speakers behind an acoustically transparent screen. So he did commandeer some of the closet space for the equipment rack in the corner of the room and a subwoofer niche below the screen. And he put this main front, center, left and right speakers above the screen. They're paradigm mini monitor LCR speakers. And as you can see here, they're mounted above the screen, pointing down toward the seating position. It's not ideal, but given the constraints of the room, it was probably the best solution. Certainly I agree with keeping the speakers all in a line rather than having say, the left and right above the speaker above the screen and the center below the screen. That would not have been good. In the next one we can see the sofa, which was brought from a previous theater, works perfectly well here. And in the next picture we can see the niche created by the now sealed window, which gives the projector a bit more throw distance. You can see also the anamorphic lens sitting in front of the projector. It's in a fixed position, it doesn't move in and out of the way. And the projector processes the video according to the image's intended aspect ratio. David discovered this anamorphic lens from a company called Panamorph. It's the Cine Vista and it costs about a thousand bucks, which is not too bad for an anamorphic lens. High quality glass is always going to be expensive, always. Camera lenses, any kind of high quality glass is always going to be expensive, expensive. So with this pan, with this panamorphic lens, the projector can do something called constant image height or CIH, which changes the width of the image from 4 to 4 by 3 for older style TV shows, 16 by 9 for HDTV and 2.3, 5, 1 for movies all have the same height, which is a very common and worthwhile way to do images of different aspect ratios. In the next graphic, you can see the little curvature in the screen, which again, helps with this issue of pin cushioning, which is when the projector's image is either too. I think it's too high for the, for the screen, at the edges of the screen. And the curvature helps solve that problem. In the next graphic, you can see the equipment rack, so to speak. It's pretty small. It doesn't have a lot of. It's behind a fabric covered door next to the subwoofer, and the connections are managed in the closet behind the wall, which I. That's a pretty cool idea. I like that. He says he's especially proud of the hidden equipment rack. He says, quote, I spent an inordinate amount of time figuring out how to make the equipment rack door completely hidden. But he worked. It works. He did it. Beautiful job there. So in the last picture, we can see the. See the theater with some kids enjoying a movie. You know, there you can see in the corner the, the pilaster with the surround speaker and the acoustic treatments. All the walls are fabric covered. It's a really beautiful theater in such a tiny space. It's. It's really good. I, I like it quite a lot. He says the active planning phase took about three months and construction took about another four months at a total cost of only $12,000, which is really, really good. Now, granted, this is 2013, and he said that was equally divided between the equipment and the building materials. He already owned some furniture from his previous theater, so, you know, he brought that along and, and some equipment as well. So, you know, he was able to save money on all of that and he did all the work himself. I love these DIY projects. I mean, sure, if you have the money to hire a professional installer, great. I'd say go for it. But if you want to save money and you're handy, doing it yourself can really save a lot of money and be very satisfying at the same time. Now, in 2013, the system was only 5.1. No Atmos, no rear surrounds. He couldn't have rear surrounds in that setup anyway because the couch is almost virtually up against the back wall. As I said, they were paradigm mini monitors for the front lcrs and Paradigm Atom monitors for the left and right surrounds. And as I mentioned, the SVS SB12 12 inch subwoofer. At the time, he was using an onkyo receiver tx nr818, which was very good for the time. And the projector was the epson Home Cinema 8350, which was 1080p. Okay, this was 2013. Remember sources. He had the Sony PS4 for playing games and Blu Ray discs and an Apple TV3. So we've come a long way since then. Equipment changes very quickly, and in the last 12 years, it's changed a lot. And I'm sure David must have upgraded the equipment by now, but the, the, the fundamentals of the room didn't change, and I think he treated those extremely well. So now hopefully he has atmos, he's got some speakers overhead, he's got a 4K projector. But the room is the room and the room is great. So I applaud David Chu for doing such a great job with so little space. So on this show, we often answer listener questions. If you have one for me, send it along to HTGWIT TV and I'll answer as many as I can right here on the show. Now, all of the episodes of Home Theater Geeks are Now available on YouTube to view for free with ads. If you want to go ad free, join the club, just go to Twit TV Club Twit and join up. You'll be able to see all the Twitch shows with no commercials. So I hope you will do that. Until next time, geek out.