← Wildlife and Adventure Photography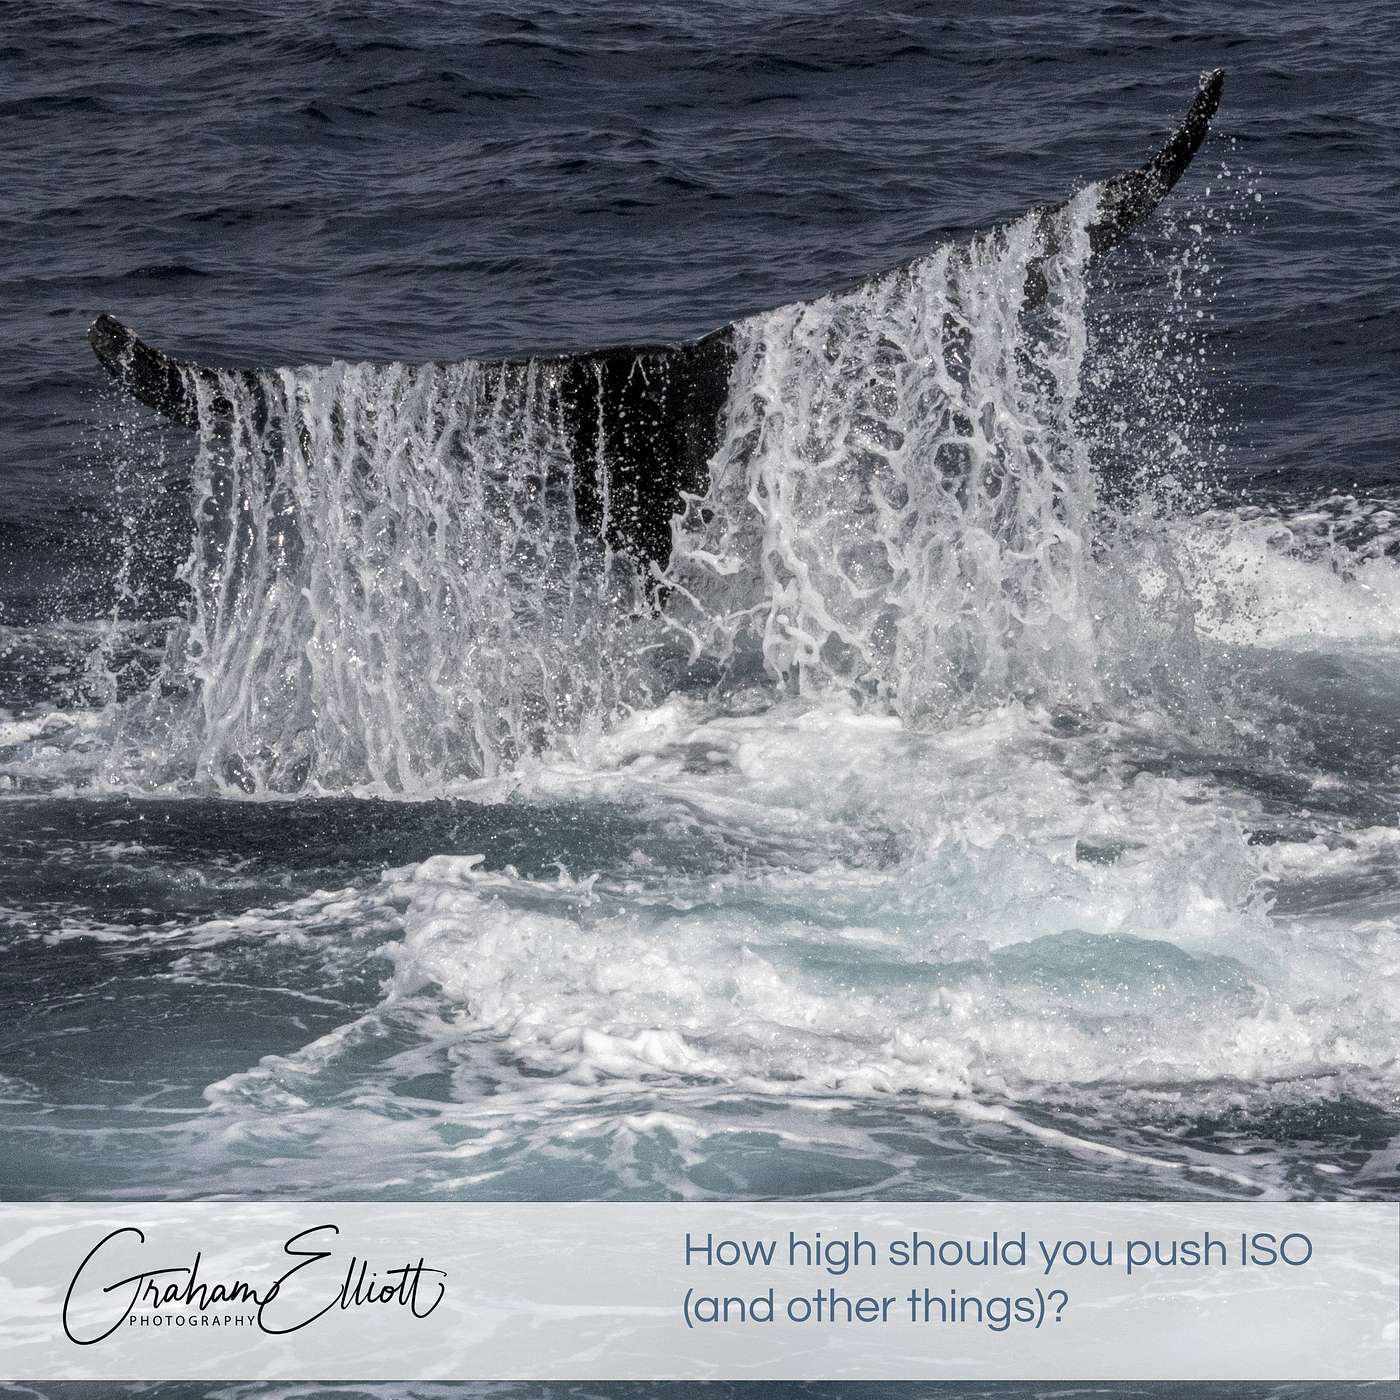
Loading summary
Transcript1 lines
- [00:00]
A
Foreign. Hello again and welcome to another podcast. Now, this particular episode is, I guess, in response to an email that I received from Scott. Thank you very much for that. Who asked a question, and he was basically asking, how high am I willing to push ISO in order to get an image? And that's relating to shooting with a high shutter speed, which is what I generally recommend for wildlife. So it's a very good question. And before I get into it, I will say, if you do have questions, please get in touch. I'd love to hear from people. And as much as I generally have something to talk about on these podcasts, I also want it to be as relevant as possible to you. So if you have any questions, please drop me an email, Graham Photography, and I will do what I can to answer your question. So, getting back to this question, obviously, when it comes to ISO, the general rule, and I. I certainly say this to people as a general rule, is to keep the ISO as low as possible. And the reason why we do this is to minimize the amount of noise, like let's call it. And noise in a digital image is essentially where you can begin to see the pixels very clearly. And it's much easier to see them when you've got an area of one color. So, for example, a block of sky, something like that, or if you're. If you're shooting a building, if it's clean wall, things like that. And the reason that we do that is that as you dial up the ISO, that digital noise becomes more noticeable. Now, when I'm talking about ISO, I generally talk to keep it simple. I'll talk about the ISO making the sensor more sensitive to light. Fact, that's not what happens. So the sensor remains as sensitive as it is to light, but as we dial up the ISO on a digital camera, we're essentially amplifying what's already there. So if you imagine having a conversation with somebody and there's a lot of background noise as you turn up the amplification, so you increase the volume, what you're doing is not only amplifying that person's voice, which is what you're interested in, but all of the background noise as well. And that's essentially what happens in digital camera. So the sensor is not getting more sensitive, but what's happening is you're kind of amplifying what it's seeing. And that's where we start to get this noise coming in. So coming back to how high am I willing to go? Well, I'll just pretty much use the whole range of the camera, frankly, because the number one concern that I have is to get the shot. And the example that I gave him in an email exchange we had was when I was in Finland last year photographing bears and I was lucky enough to see some foxes. I. As the light went down, I just pushed the ISO right up so that I could get some sort of an image. And I'm getting the. I'm using the fastest shutter speed I can because I prefer to usually just stop the action, so freeze the animal. But in that instance, what was happening is I couldn't shoot fast enough because the light was getting so low. Even with maximum ISO and max and the widest aperture I could set up, my shutter speed was still very low. And in fact, later in the first night I was doing this, we had some wolverines appear right outside our hide. And I couldn't take any photographs. It was just far too dark. So that's the first thing. So I'm happy to push the ISO right to the limit in order to try and preserve shutter speed, because that's primarily what I'm interested in when I'm trying to photograph wildlife, because I like to get the animal nice and sharp. And the way that you do that is by pushing your shutter speed up. And generally you want to be, I would say, at least the high hundreds and maybe in the thousandths of a second to do that. It all depends on your situation, how much the animal is moving, how much you're moving, all those kind of things, and if you're. And whether you're hand holding the camera or you've got it on a tripod. So all these factors come into play when it comes to determining what shutter speed you need and then what shutter speed is possible with the light level you have and the camera you have. Now, this brings me on to another thing. And I remember this is going back a few years now, probably seven or eight. In fact, at least seven or eight years there was. I went to launch, the launch in Sydney of a new Leica camera, and it had the most amazing low light capability. Even dialing the ISO right up really high, it produced beautiful images, at least what we were being shown. So I didn't. I didn't use it myself. And I think the thing to remember is that the technology around camera sensors, the sense of technology is improving all the time. It certainly has improved over the last decade. And so what you manage to achieve with your gear will honestly come down to. Often come down, well, pretty much always come down to, in fact, how good your sensor is the sensor in the camera that you're using. So that's the first thing. And something I shared was that I'm, as we speak, in the process of finally shifting across to mirrorless, because I've been using some very good Canon gear for quite a few years now. But it just feels like it probably felt time a little while ago to move on, but I didn't for various reasons. So I'm shifting across from using a Canon EOS 5DS, which is my main camera, camera body, and a Canon EOS 7D Mark 2, which is my backup. And that's a crop sensor. So I use that for things like dolphins, anything that's moving really fast. And I want to do long bursts because the fire will tend to run out of steam a little bit the way I have it set up. So what I'm trying to say here, I guess, is that the newer your camera, broadly speaking, the better performance you're likely to get out of the sensor. And once I've got my new gear, I'll. I'll do, maybe do a report back on the differences that I've noticed in switching from DSLR to mirrorless and maybe share some insights or what I'm learning just to. Hopefully it may be of use to you. So that's that aspect of it. Now, with shutter speed, I'll mention that briefly and I'll come back to sense, because there's another point about this. So just when it comes to photographing wildlife, do, do remember to just shoot as fast as you can, is my general suggestion. Unless you particularly want movement in the image, then I would suggest getting up into at least one thousandth of a second, maybe faster, because that generally will freeze things unless they're happening really fast. And even with pictures of. If you've looked on my site or looked at my Instagram or I've got pictures of breaching humpback whales, then I like to freeze the action and the shutters. The sort of shutter speed I'm using there will typically be around 1 2000th of a second. So if you want to absolutely nail a moving animal in as much as you want to completely freeze the action, I would just go for the fastest shutter speed that you can use and with all other things being equal. So in other words, particularly with ISO, maybe keeping that lower because that might reduce the chance of getting obvious noise in the image. So they're the general rules that I go by. But the point about rules is rules are basically guidelines, so I always recommend you treat them as such rules Give you a place to start, but not a place to finish. So you know, all of these things like rule of thirds, whatever you're using for composition, all of these rules for shooting, use them as a starting point. And again, I, I generally recommend that in terms of aperture, you start somewhere in the middle, maybe F8, F11, depending on what you're using. If you have a cheaper lens and certainly an older lens, then you're likely to get better performance at that aperture than if you're at the edges of whatever it's capable of. But again, to be honest, these days, things have moved on and most certainly from the original equipment manufacturer. The, the lenses are pretty good and even a lot of the independents, so Sigma, Tamron, those kind of people, they're, they're producing really good quality lenses that are far better than you, you would have got maybe a decade or two ago. So again, just treat suggestions as exactly that. They're places to start. And when I'm giving suggestions, I'm very conscious that I don't know what you're using, I don't know what the conditions are that you're shooting in. So it would be insane for me to tell you to use specific settings when I have no idea what you're using and what kind of result you're likely to get. So everything is a guide, everything's a starting point. So this also takes me on to something else which comes back to specification and it's more relevant to low light photography. So this is where we come back into ISO in a kind of tangential way. A tangential way. So if you're thinking of a new camera, what we tend to get caught up with often are the megapixels. So, you know, is bigger, better? Well, not necessarily. And that's for a couple of reasons. One is to do with how you're planning to use your images. So I always like to start with the end in mind, as it were. So if you're only intending to shoot images to be used on social media, you can get away with a very, very low resolution camera. In fact, there's, there's a bit of a trend going retro with these low resolution sort of early digital cameras. I assume they're imitations, but I don't know, I've not really got into that having lived through it. But something very, very basic is fine. You do not need a high megapixel count and it's important to actually be clear on what that gives you. So the pixel count is about resolution in the image. So in other Words, if you've got a 24 megapixel camera, and also remember that in a lot of these cameras you're not always shooting to that resolution. You often have options in the menu somewhere if you ever delve in there, to reduce the file size, the number of pictures, the resolution of the image, you can go for a low resolution. And the reason that that's done is that it produces smaller file sizes. The camera's faster when it's writing from the capture equipment down to the internal storage card. So there might be advantages for you there. You can get more images on there. So first of all, be aware of that. Secondly, the real point of the pixel count is that that is your resolution. So in other words, if you've got a 24 megapixel camera that you're shooting at 24 megapixels, it, for every image that you shoot, you've got 24 million points essentially to make up that particular image. Does that matter? Well, again, it comes back to how you're using it because if you're only ever going to look at images on a laptop screen, for example, you don't need that kind of resolution. Just have a look at the resolution of the computer you're using. And that's the final, that's the maximum resolution that that screen can deliver anyway. So there's no point throwing anything bigger at it. So that's one point. So the pixel count is about resolution. How much detail can you get into any image that you shoot? And that's the, that's the limit. Coming back to low light, how does that impact low light performance? So if I was to take a 24 megapixel full frame digital camera and a 24 megapixel cropped frame, maybe an APS C camera, and shoot the same image on those two, I'm going to get the same resolution, but all other things being equal, so the sensors being of the same technology, the full frame is going to give me better low light performance, or at least I would expect it to give me better low light performance. And the reason for that is that those 24 million pixels need to be, need to fit onto the surface of the sensor. And that's got a physical size. So that means if you've got 24 megapixels there, they will have a particular size. And that size on the sensor is determined by the overall size of the sensor. So if it's an APS C sensor, a crop frame sensor, that is a smaller size than a full frame. So each individual pixel will be physically smaller. And because it's smaller, it's less responsive to low light. So basically the bigger the pixel is physically the better performance you would expect in low light. So this is one of the, you know, part of the conversation around do you need a full frame or an APS C, a cropped frame camera? Well, that's definitely one of the the things to consider. It does depend on more than that because as I've said, sense technology moves on and you're not always comparing like with like. If the sensor technology between two cameras is different, then you need to really look at the low light performance. But that is one of the things to bear in mind and it's kind of defines the broad difference between full frame and crop sensor and where the pixel count comes in. So if you really need a high resolution image, and because with my images I want to often print them, that's one of the things I do. And I have a new collection which should be out when this goes live. And the biggest image is one and a half meters by one meter. So that's pretty big. Obviously, if I'm putting together prints of that size, I really want to be starting with the highest resolution original image that I can manage. And that's where my EOS 5Ds comes in. Because it can produce original image resolution that can be with a bit of extra software pushed up to that sort of size. So that's the first thing. But of course there is a downside with full frame and often it's cost. It can be size and weight, possibly power consumption, probably not much difference there. But these are all things to consider. So how are you going to use the camera? Are you likely to be hiking with it for long distances in which. And if you're particularly if you're doing it often, then you need to make you really want to keep your weight down. Because if you're hiking a distance with a camera and maybe some lenses or maybe a couple of bodies, which is what I tend to do, you've also got probably spare clothing, maybe wear weather clothing if you might need it. You should be carrying water, maybe some food, things like that. So packs tend to fill up a little bit, which is why I always recommend buying backpacks with hip straps on them, because that drops the weight down onto your hips and not on your shoulders and your back. But of course the camera gear you're carrying has a weight as well. So if that's a thing for you, then a crop frame might be better. And certainly a crop frame mirrorless would be better because physically everything's smaller and that's. And obviously lighters. That's an important aspect to it. The other thing to bear in mind is simply lenses available, making sure you can use the same mount. There are different mount options even within the same manufacturers. And even with DSLRs, there are certain lens options that I can use on my EOS 7D that I can't use on the 5, for example. So you just need to be aware of what's available and basically look at what your requirement is in terms of how you're going to use the images, how you're going to get them, where you're going to be, how you're going to get to your subjects and start putting together the kind of ideal list of features and which things will tend to rule out one type of camera or another. So that is really what I wanted to talk about in this podcast. So I guess just to recap, first of all, should you be using high ISO when you're shooting animals, shooting wildlife? I mean, I was pausing because honestly, it applies to shooting anything. And my answer to that is simply, well, you know, you need to do what you need to do to get the shot. That might be your only option. You have to. What's much more important is understanding the performance of your own camera. So this is where practicing becomes really important. So use the camera in the kind of situations you're likely to find yourself in, which presumably is low light it may be in in this circumstance, and wind the ISO right up. If it's more general photography, then look at what sort of results you get. So if you're photographing, if you're shooting an image with a lot of sky in it, how much can you wind the ISO up before the, the pixels, the noise begin to become obvious? Now you can get rid of some of it in post. I use Photoshop and that definitely does it. I have another package that's designed to reduce that kind of stuff. But obviously the. The most important things to try not to have it there in the first place. So really get to know your gear and try things out. If you need to push the shutter speed up. Up, sorry, Push the ISO up in order to increase shutter speed, then go for it. Because it's probably more important to get a nice sharp image, even if it's got a little bit of noise on it, because you can always work with that in post a little bit or maybe even go black and white. That's. That tends to be what I do if I have an image that hasn't quite made it the way I wanted in color. I'll always have a look at it in black and white. The other thing is, obviously, when it comes to getting correct exposure and the right shutter speed, also just look at how you're using aperture. If you are using a very deep depth of field, do you need it? That's another question. And although I understand that for a lot of people, they're used to seeing things that way, especially if you've just come out of auto, you may well be used to seeing everything in focus, then I absolutely recommend that you start to experiment. Because the more you open the lens, aperture up, of course, so as you bring the F number down from, say, I mean, you might be at F8, you might drop down to 5.6, get down towards 2.82, that those kind of numbers, obviously what you're doing, you're opening the lens up. So that makes your lens faster. In other words, you can use a faster shutter speed with those settings. And yes, you're narrowing the depth of field. But I shoot that way anyway, obviously, honestly. Because what I found is I want. When I'm shooting, shooting an animal especially, it's just a wildlife comment. I guess what I'm focused on, first of all, is the eye of the animal close to me. If it's sitting there, if it's reasonably stationary, first thing I do is make my focal point the eye that is closest to me. Because we connect through eyes. Whether we connect or looking at or connecting with a person or an animal, it's through the eyes that that happens. So when it comes to photographing wildlife, that's how you do it. That's how you allow the viewer to get some sort of connection with the animal. If you can grab the eyes and get them fairly clear, that is a really good shot, in my opinion. So if you've managed that, then I would definitely recommend using a bit physically bigger aperture, so a lower F number. Because what that does, if a proportion doesn't matter how much it is, the rest of the frame is out of focus. What it does is draw the viewer's eye back to the eye of the subject, which is sort of where you want them to be anyway. You're guiding them through the image in one way or another so that they get to the point where you want them to be looking, which generally would be the eye of the animal. So don't forget the creative potential of experimenting with aperture as well as shutter speed. So when I talk about these things, and I do have a Short course coming up. If you haven't looked, please take a look on my website, www.ge.photography and have a look at. I think it's improving your photography, something like that. There's a drop down. I apologize for any background noise you can hear. And I've got three webinars running at the moment every couple of weeks and there's also some short courses, so. And I go into, in fact composition and getting out of auto and all this kind of stuff. These are coming up and there's another one on wildlife photography also in the works. So that's the advert. So, yeah, think about what you're doing, but experiment. If you're finding your limited by one aspect of the exposure triangle, which is essentially what we're talking about with ISO, shutter speed and aperture. There is something else. See what? See what the impact is on the image. So I hope that's useful. That's it. So it's not quite part of the series that I'm running with, or I'm running with a few series of ideas on podcasts, but again, as I said at the start, if you have any ideas, anything you'd like me to cover, or you have questions, please get in touch. I really love it. Please remember to like and subscribe on the podcast, particularly if you're using YouTube when this goes out, there will have been a video YouTube podcast go out, so I'm experimenting with those. It's just a bit tricky sometimes because I have quite a lot going on at the moment with all the webinars and courses and things that are happening. So thanks for that, I hope you found that useful and I'll speak to you again in the next podcast, which will be on Friday. Bye for now. Thank you for listening. Now, just before I go, surprisingly, I'm going to ask if you could like and subscribe because a lot of people don't and it really makes difference. So please do that if you can. Now, I have a few things going on. There are free webinars every month at the moment. Short course is running, so please take a look at the website www.ge.ography and you'll see what's happening. As I say, there are a few things going on and hopefully something that will float your boat. So thanks for listening to the podcast. Have a great day. I'll speak to you next time. Bye for now.